NGOT Gitops Workflow New Release#
Introduction#
Gitops Projects#
Each production line has it's own Gitops Workflow project:
Gitops Repositories#
In order to create a new release in Gitops Workflow for NGOT clients, it is necessary to update the following repositories :
Templates CI- contains the templates of all deployments:templates-clients- creates the link between NGOT client repositories andTemplates CIrepository;client repositories- used by NGOT clients to deploy their configuration files (prometheus-rules/probes/dashboards).
Repositories references#
The reference of each repository is different:
Templates CI: a branch calledtemplates-ci-<release>;cs-factory-environments/templates-clients: a tag calledtemplates-client-<release>;cs-factory-environments/obs-${CLIENT}: themainbranch.
Gitops versioning#
The release versioning number follow the classical schema x.y.z:
xfor a breaking change;yfor adding a new fonctionnality;zfor a bug fix.
Steps#
Tests#
Step 1 - Update Templates CI repository#
The default branch in Templates CI repository is templates-ci-<release>.
In order to test a new release, create a new branch called templates-ci-<new-release> starting from templates-ci-<release> branch and push it:
cd templates-ci
git checkout templates-ci-<release> && git pull
git switch -c templates-ci-<new-release>
git push
git switch -c templates-ci-<new-release_pfxxxx>
In the new branch (templates-ci-<new-release_pfxxxx>):
- Update pipelines with expected changes ;
-
Update value of
MY_COMMIT_BRANCHincommon_keywords/variables_k8s.ymlfile.Example :
MY_COMMIT_BRANCH: "templates-ci-<new-release_pfxxxx>"
Step 2 - Update Templates-clients repository#
The default branch in templates-clients repository is the following:
- branch:
main; - tag:
templates-client-<release>.
In order to test the new release, it is necessary to:
-
Create a new branch called
templates-client-<pfxxxx>from main branch. -
Update the value of
TEMPLATES_CI_COMMIT_BRANCHkey intemplate-update_kubeobjects4clients.ymlfile. Example:template-update_kubeobjects4clients.ymlvariables: TEMPLATES_CI_COMMIT_BRANCH: "templates-ci-<new-release_pfxxxx>"
Step 3 - Update client repositories#
In order to test the new release number in one client repository (staging03 for example), edit.gitlab-ci.ymlfile of the main branch to indicate branch name oftemplates-clients` repository:
include:
  # Default variables
  - project: 'cs-factory-stg/cs-factory-environments/templates-clients'
    ref: 'templates-client-<pfxxxx>'
    file: 'template-update_kubeobjects4clients.yml'
Verifications:
-
add a test prometheus-rule/probe/dashboard file in client repository in main branch. The presence of a new file in the
mainbranch will trigger the pipelines in charge of deploying these objects on the cluster of the client; -
check the pipelines are in
Passedstatus; -
check in client Grafana the presence of the newly deployed object;
-
check the new feature/bug fix contained in the new release.
If it is necessary to troubleshoot (like in the case of Failed jobs), you can use the methods described in troubleshooting part of this document.
Cleanup:
- launch uninstall:all job in the
Blockedpipeline; - remove the files corresponding to the test objects used for tests (dashboard/probes/prometheus-rules) in client repository.
Cleanup checks:
- uninstall:all job should be in
Passedstate; - client Grafana should not contain anymore the test objects (dashboard/probes/prometheus-rules);
- test object should not be in client repository, main branch of the test repository. Exemple for staging03.
Deployment preparation#
In order to release a new Gitops Workflow version for NGOT clients, it is necessary to follow the standard change procedure.
Templates-ci#
Edit common_keywords/variables_k8s.yml file and modify the value of MY_COMMIT_BRANCH with the new reference branch name.
Example:
variables:
  DOCKER_NAME: "portainer/kubectl-shell"
  DOCKER_TAG: "latest"

  # Variables spécifiques
  GRAFANA_DASHBOARD_LABEL: "grafana_dashboard"
  RESULTS: "myresults.txt"
  MY_RESULTS_DIR: "myres"
  MY_ERROR_DIR: "myerrors"
  MY_COMMIT_BRANCH: "templates-ci-<new-release>"
  CLIENT_COMMIT_BRANCH: "main"
Create a Merge Request to merge the new branch templates-ci-<new-release_pfxxxx> into templates-ci-<new-release> branch and ask for a validation.
Warning
The Merge Request must have templates-ci-<new-release> as destination branch.
Templates-clients#
Update the value of TEMPLATES_CI_COMMIT_BRANCH key in template-update_kubeobjects4clients.yml file. Example:
   variables:
       TEMPLATES_CI_COMMIT_BRANCH: "templates-ci-<new-release>"
Create a Merge Request to merge the branch templates-clients-<pfxxxx> into the main branch and ask for a validation.
Gitops-tool#
Create a Merge Request containing references to the new release.
Client repositories can be managed with scripts contained in gitops-tools repository.
In order to modify the new release number in client repositories:
-
Edit
configs/comet-*.yamlconfiguration files and update the following parameters:version_templates_clients: new release tag name oftemplates-clientsrepository;branch_templates_clients: new release tag name oftemplates-clientsrepository;-
branch_templates_ci: new release branch name inTemplates CIrepository.Example:
ngot/configs/comet-*.yamlversion_templates_clients: "templates-client-<new-release>" branch_templates_clients: "templates-client-<new-release>" branch_templates_ci: "templates-ci-<new-release>"
Note
The configuration files will be used during the CAASCHR after the merge of different Merge Requests and after the set of
templates-clienttag. -
Create a Merge Request and ask for a validation.
CAASCHR preparation#
Use the following template to deploy.
Troubleshooting#
Debug Mode#
-
Set the
CI_DEBUG_TRACEparameter totruein the job you want to troubleshoot. Thejobsdirectory can be found in theTemplates-cirepository:Note
The version value in the job URLs may change over time. As of this date (14/11/2024), the current version is
1.0.1.Setting this environment variable enables verbose logging for job commands, which helps in tracing issues with command execution.
In our configuration example we want to enable debug mode for
prometheusrulesfiles lint. This need to be done in the 2_job-prejob.yml file inTemplates-cirepository,jobsdirectory:prejob:lint-prometheus-rules: variables: SOURCE_REPO: "prometheus-rules" CI_DEBUG_TRACE: "true" NS_PREFIX: "rules" -
Merge a new
prometheusrulefile into one of the client’s main repositories. This will use the debug-mode configuration, resulting in more verbose output for easier troubleshooting.
Local Docker Logs#
It is possible to run the jobs locally using docker in order to capture more detailed logs and to perform interactive tests.
Check in the job .yml file what image is beeing used.
In our example we need to troubleshoot file linter for prometheus rules:
# Prejob : lint kubernetes .yaml files
prejob:lint-prometheus-rules:
  variables:
    SOURCE_REPO: "prometheus-rules"
    NS_PREFIX: "rules"
  stage: prejob
  image: pipelinecomponents/yamllint:latest
Get the image on local:
docker pull pipelinecomponents/yamllint
Examples:
-
To test disabling specific linter rules:
docker run --rm -v /tmp:/shared:ro pipelinecomponents/yamllint -f colored -d '{extends: relaxed, rules: {new-lines: disable, line-length: disable, empty-lines: disable}}' /shared/citrix-test.yaml -
To convert a
prometheusrulefile to Unix format usingdos2unix:docker run --rm -v /tmp:/shared:ro pipelinecomponents/yamllint dos2unix /shared/citrix-alertingrule.yamlIn this example:
docker run: Runs a Docker container.--rm: Automatically removes the container after it exits.-v /tmp:/shared:ro: Mounts the/tmpdirectory from the host system into the container at the/sharedpath with read-only access, so the container can read files in/tmpbut cannot modify them.pipelinecomponents/yamllint: Specifies the Docker image to use.dos2unix /shared/citrix-alertingrule.yaml: Runs thedos2unixcommand inside the container to convert thecitrix-alertingrule.yamlfile from DOS (CRLF) to Unix (LF) line endings.
Artifacts in GitLab Interface#
-
In the repository you want to troubleshoot, navigate to the following menu on the left side of the page: Build > Jobs, then click on the job with the
Failedstatus. -
On the right side of the page, go to the Job artifacts section and click on Browse to follow the provided links.
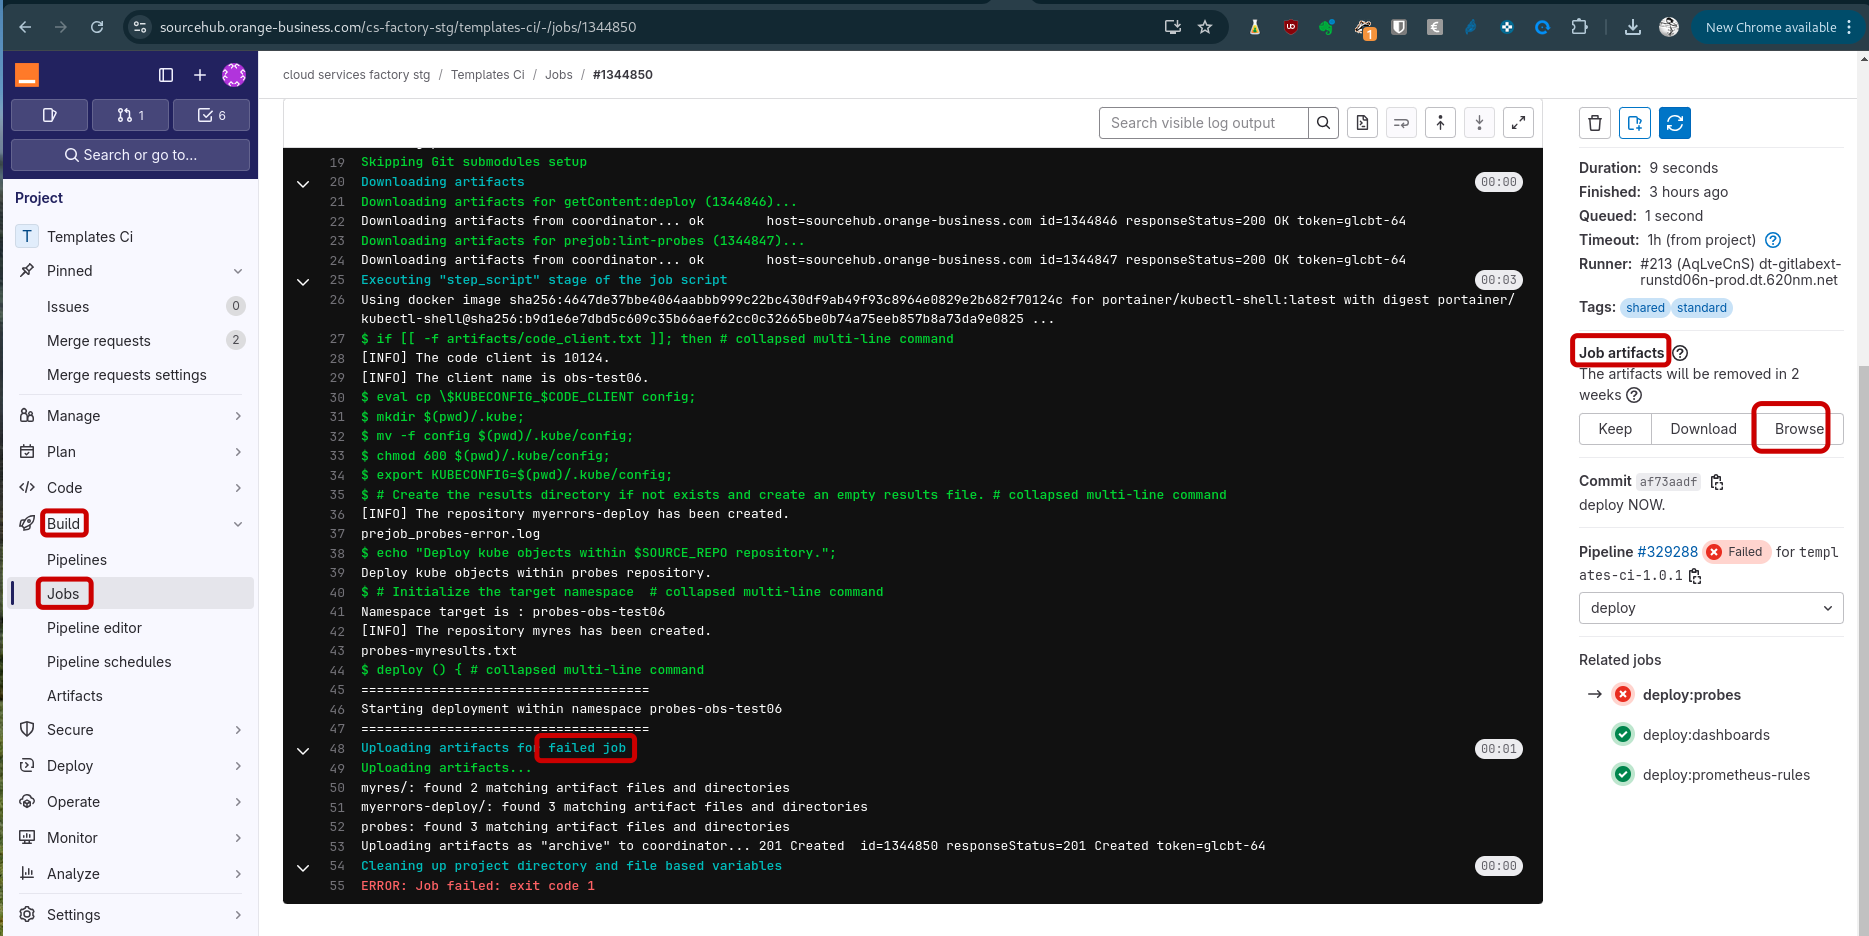
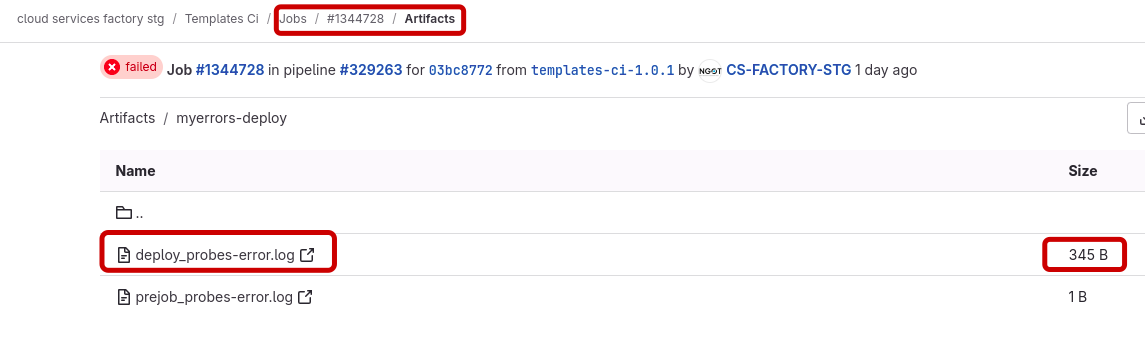
Large log files in this section will typically contain the errors you are trying to diagnose.